Hello
I'm back from being gone. Over the next few posts I'll try do a catch-up on some of the craftiness that's been going on over the past while...
Here are a few pics of some of what may follow:
You may notice a new trend...
Stuff that's happening in the stuff zone. I'm not a great crafty person, but I enjoy pottering about making arb stuff and sharing that with others. Some things are eddible, some are usefull and some things are just stuff with no practical use or function or anything. It's all part of the fun sharing ideas and learning along the way...
Tuesday, 22 April 2014
Thursday, 9 February 2012
Something to smirk about
For Christmas the girls in the family over here gave me a book on making softies. So finding myself with time on my hands, I got down to some toy crafting again. I must admit that having a pattern to follow makes it so much easier and quicker than creating one by trial and error yourself.
Today I finished making a "Smirky". I used the fabric I had on hand, and it kind of stretched a bit funny so it looks a little different to the picture, but I still feel I have something to smirk about.
He is the first "baby safe" toy I've made that doesn't have buttons or goggly eyes and I think he is pretty cute.
If you like him, you will find his pattern by Sandra Monet (and many more patterns by other great crafty people) in this book:
Today I finished making a "Smirky". I used the fabric I had on hand, and it kind of stretched a bit funny so it looks a little different to the picture, but I still feel I have something to smirk about.
He is the first "baby safe" toy I've made that doesn't have buttons or goggly eyes and I think he is pretty cute.
If you like him, you will find his pattern by Sandra Monet (and many more patterns by other great crafty people) in this book:
Happy crafting!
Tuesday, 31 January 2012
The BIG nappy bag
At last it is finished (well, it was finished last week...but now I've finally updated the blog)!
I have made my very own nappy bag. I didn't have a pattern, but rather browsed through pictures on the Internet and made my concoction.
It even has a plastic base (inside and out) for a quick wipe when needed and in case the bag has to be placed on a wet surface.
There are pockets inside and out and although it turned out to be pretty big, I'm sure I'll be able to fill it on our future outings...I'll just have to learn as I go to know what those fillings will need to be.
Any mom's out there feel free to leave your comments of advise on what essentials you need to take with on day trips?
It even has a plastic base (inside and out) for a quick wipe when needed and in case the bag has to be placed on a wet surface.
Any mom's out there feel free to leave your comments of advise on what essentials you need to take with on day trips?
Next up: to make a matching change mat
Labels:
Nappy Bag
Monday, 23 January 2012
Piglets and Chickens
It's the start of the Birthdays for 2012 and thus far they are off to a good start.
A friend just loves pigs, so for her it was a batch of little piggy vanilla cup cakes
Next up, I made some chocolate cupcakes (with a little twist...I put a chunk of chocolate and a dollop of caramel treat inside each one before baking)
There is an assortment of toppings:
Now I have to try contain myself and wait for my man to get home so I can see if the twist worked...
A friend just loves pigs, so for her it was a batch of little piggy vanilla cup cakes
I pipped the pink icing on. The snout and ears are made from marshmallows that have been cut in half. With the ears being pinched into a triangular shape. Silver balls for the eyes and using a tooth pick dipped in food colouring paste to get the two little nostrils.
Next up was my man's birthday (which is today actually).
If you have watched "Despicable Me", then you may be familiar with the finger puppet book called Three Little Kittens and the new one that Gru makes. If not, here are two video snippets to fill you in: Three Little Kittens and then Gru's Unicorn Book (not my videos, I just found them on U-Tube).
You can apparently buy the Three Little Kitens Book, but the reviews got me thinking about making my own version.
I modified the story line a bit...and made a story puppet book card. It has two little pink piggies and three little chickens.
Why, you ask? Well because they have a special meaning for us ;)
I just love the little chickens!
The puppets fingers were machine sewn along the edge and the bottoms were turned in and hand stitched. A pair of cotton gloves could be used I guess, just snip the required number of fingers off.
Then taking a rectangle of cardboard, I cut out two/ three circles using a medium sized cotton reel for the size (something a bit wider than the fattest finger). Then using a glue gun, glue the outer edges of the finger holes to the back of the circles. The piggies and chickens were made with little pompoms, bits of felt, a few beads and feathers and some goggley eyes. The beaks where diamond shaped felt bits, folded and stitched along the folded edge. The beads were also sewn onto the pompoms for the piggies nostrils. Everything else was glued in place.
The cardboard was then glued onto the book. Unlike the book in the movie, mine don't go through the pages, they just peer over the top.
**Please note these puppets would not be suitable for little kiddies due to the possible choking hazard of the little pieces**
Next up, I made some chocolate cupcakes (with a little twist...I put a chunk of chocolate and a dollop of caramel treat inside each one before baking)
There is an assortment of toppings:
| Cherry Chocolate, Chickens, Piggies, A Sheep and Chocolate Caramel Cupcakes |
| Little Chicken Cupcake |
| Little Piggy Cupcake |
| Sheep Cupcake |
| Cherry Chocolate Cupcake |
Labels:
Animal cupcakes,
Finger puppet book
Thursday, 22 December 2011
Christmas Treats
A long awaited and belated Greetings.
It has been a busy second half of the year, filled with mostly good things and an extra special blessing.
Not much has been happening on the crafting front, except for a last minute dash before Christmas.
There is a table cloth, that may have been rumoured many moons ago...that is finally a work in progress, but sadly will not deck the Christmas table this year...but maybe next, but at least it's no longer just a bundle of fabric...it's now piles of lots of little bits of fabric that have been stitched with "X"'s (all shall be revealed in good time..well maybe not good time, but at some time)
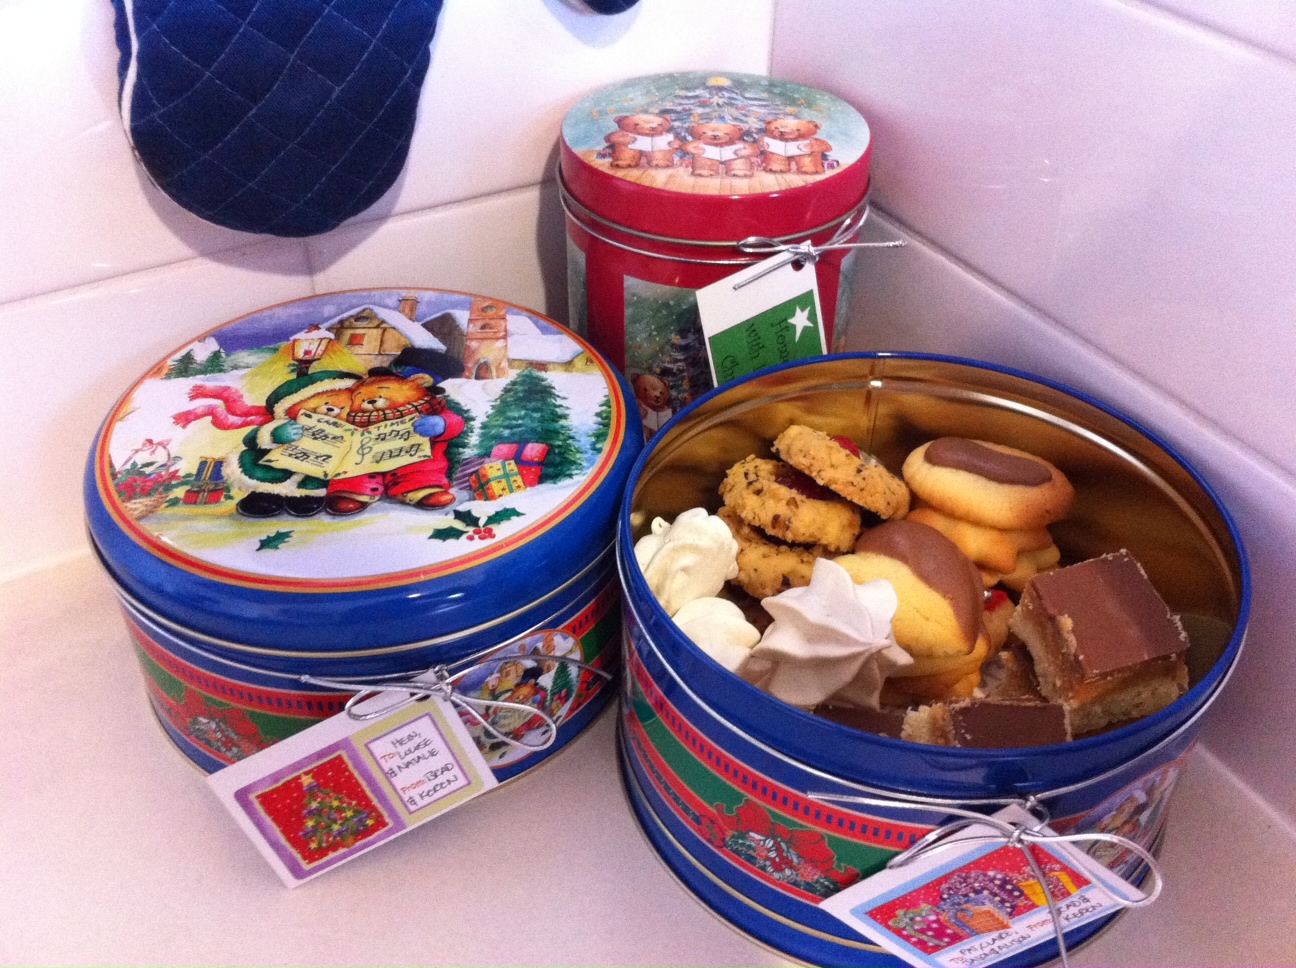
A successful project though that has been completed in time this year is my tins of Christmas treats.
The tins were purchased along with some Christmas napkins and then the biscuits, meringues, millionaires shortbread and Santa's buttons were baked and tucked away into the tins, complete with little "Home-made with love" tags (well 1/2 home made cards and 1/2 bought labels).
And here they are:
It has been a busy second half of the year, filled with mostly good things and an extra special blessing.
Not much has been happening on the crafting front, except for a last minute dash before Christmas.
There is a table cloth, that may have been rumoured many moons ago...that is finally a work in progress, but sadly will not deck the Christmas table this year...but maybe next, but at least it's no longer just a bundle of fabric...it's now piles of lots of little bits of fabric that have been stitched with "X"'s (all shall be revealed in good time..well maybe not good time, but at some time)
A successful project though that has been completed in time this year is my tins of Christmas treats.
The tins were purchased along with some Christmas napkins and then the biscuits, meringues, millionaires shortbread and Santa's buttons were baked and tucked away into the tins, complete with little "Home-made with love" tags (well 1/2 home made cards and 1/2 bought labels).
And here they are:
With that I wish you all a Blessed and Merry Christmas and all the best for 2012
Labels:
Christmas bakes
Saturday, 30 July 2011
At long last...
At long last here's an update of the recently completed crafty projects...
And...it is personalised with her name on the front and a little red cross as she is studying nursing. I only sewed the name panel on loosely in three places so that it can be removed without too much trouble if my niece doesn't fancy having her name for all to see :)
Then (a project which was mentioned ages ago in my blog) I finally finished the long awaited baby blankie for my nephew.
It is so soft and snugly that I want to keep it for myself.
It was quite a challenge for me, never having worked with binding and silky/satiny binding in particular...so apart from it being a bit wonky, I am pretty pleased with how it turned out.
It has a quilted patch on the front. It's a pity the print didn't have frogies instead of turtles as that would have made it perfect... "Frogs and snails and puppy dogs tails, that's what little boys are made of".
And that's the back :)
Anyway now it has been washed and dried and packed into my suitcase as we are off on holiday to go visit our family back home....Yippeeeeee!
Labels:
baby blanket,
Soft blankie,
Uni tote bag
Tuesday, 19 July 2011
How time flies...
Helloooo
Yes I'm still around though I have been rather quiet on the crafting front...what with financial year end and other paper work relating to applications and planning our next holiday....yippeeee!
I do however have a few long over due projects that I'm hoping to finish in the next week - so don't wander too far away, ok :)
Yes I'm still around though I have been rather quiet on the crafting front...what with financial year end and other paper work relating to applications and planning our next holiday....yippeeee!
I do however have a few long over due projects that I'm hoping to finish in the next week - so don't wander too far away, ok :)
Thursday, 16 June 2011
A Trifle Matter
I have had a chocolate cake staring at me every time I open the freezer for the last few months and this week-end I decided it was time to do something with it. When I took it out and left it to thaw, it felt as though it had dried out a bit...
So I now had a thawed chocolate cake staring at me from the counter begging not to be thrown away or left to go mouldy. At this point my other half suggested I turn it into a trifle.
I had a mental picture of a traditional trifle with mixed fruit and jelly and I'm afraid I could not comfortably put that combination with chocolate cake. I believed that a trifle should only be made with a vanilla sponge cake. So I had a mental block about mixed fruit and chocolate cake...I don't know where it came from or why I feel that way, but it's just an inconceivable combination to me.
So I still had a chocolate cake eyeing me out nervously from the kitchen counter, probably hurling abuse at the bin by now.
But then it occurred to me that maybe a single fruit would be acceptable with chocolate...and then the brain wave of Black Forest Cake came to me, but still convinced that the cake was now a tiny bit on the dry side, I googled black forest trifle and there it was...and I just happened to open the Nigella Lawson one first. You can view the recipe here; chocolate-cherry-trifle-recipe
I've never made my own custard (shock!), I always buy the ready to mix powder or even sometimes the ready made bottled/boxed stuff. So this recipe was a little daunting, so I cheated :)
I went and bought the ingredients (including some ready-made-thick-chocolate-custard) and did a little more googling and here is the result...sheer chocolaty-decadence!
So I now had a thawed chocolate cake staring at me from the counter begging not to be thrown away or left to go mouldy. At this point my other half suggested I turn it into a trifle.
I had a mental picture of a traditional trifle with mixed fruit and jelly and I'm afraid I could not comfortably put that combination with chocolate cake. I believed that a trifle should only be made with a vanilla sponge cake. So I had a mental block about mixed fruit and chocolate cake...I don't know where it came from or why I feel that way, but it's just an inconceivable combination to me.
So I still had a chocolate cake eyeing me out nervously from the kitchen counter, probably hurling abuse at the bin by now.
But then it occurred to me that maybe a single fruit would be acceptable with chocolate...and then the brain wave of Black Forest Cake came to me, but still convinced that the cake was now a tiny bit on the dry side, I googled black forest trifle and there it was...and I just happened to open the Nigella Lawson one first. You can view the recipe here; chocolate-cherry-trifle-recipe
I've never made my own custard (shock!), I always buy the ready to mix powder or even sometimes the ready made bottled/boxed stuff. So this recipe was a little daunting, so I cheated :)
I went and bought the ingredients (including some ready-made-thick-chocolate-custard) and did a little more googling and here is the result...sheer chocolaty-decadence!
And here is how it's done:
1. Ingredients:
1 medium sized chocolate cake
(if you look in the picture, the cake fills a standard dinner plate, and I used just over half of it)
Black Plum Jam
Bottle of Morello Cherries in syrup (I used a 700g bottle)
about 1/2 Cup Cherry Brandy/ Kirsch
approx 3 tablespoons sugar
900g Ready-made-thick-chocolate-custard
about 300ml thickened cream
Dark chocolate to grate on top
1 chocolate flake
2. Method:
Slice cake and spread jam on slices to make jam sandwiches (Watch out for pips in the jam!).
Cut slices into blocks and place in large trifle bowl. Drizzle a little kirsch (I used about two shot glasses) over the top of the chocolate cake blocks.
Drain syrup from bottled cherries into a saucepan and keep the cherries aside for later.
Add 3 tbs sugar and about 3 tbs cherry brandy and stir over low heat to dissolve sugar.
Leave to simmer, stirring occasionally. You are trying to get it to a syrupy consistency (when I did mine, I used a large bottle of cherries to there was a lot of liquid, and I had to leave it to reduce quite a bit). When you are happy with the consistency, remove from heat, add the cherries back to the syrup and leave to cool (you can keep a few cherries to use to decorate the top at the end).
Once cooled pour the syrup and cherries over the chocolate cake-jam blocks
Pour and smooth the chocolate custard over the top - cover with plastic wrap/clingfilm and place in fridge.
Just before serving, whip the cream till thick, carefully spread over the top of the custard. Grate the dark chocolate and crumble the flake on top. If you kept some of the cherries out you can use them to decorate the top too.
3. Enjoy!
P.S. When I cut the cake it turned out to still be beautifully moist! So we ate what was left of the cake just as cake :)
And...I do not like to waste food and throwing it away was not ever a real option.
Monday, 13 June 2011
Bugging around
"Where have I been" and "what have I been up to" , you might or might not be asking...
The answer is, "here and not much", though I'd love to say I've been busy crafting away and have oodles to show for it, but ...I don't.
Though as I type this, at least my hands are a teeny, tiny bit warmer as I knitted a pair of fingerless gloves. Though I must admit they have turned out a bit too big and a new pair will need to be knitted. The gloves should also not be inspected too closely as I was trying to do them in rib stitch, but kept forgetting whether the first stitch should be knit or pearled, so the ribs go a bit squonkey every now and then.... It took me one glove and 90% of the next one before I came up with the brilliant idea of marking on of the needles with something to identify which stitch to use (blush).
Oh well, so I shall re-attempt to make another pair and hopefully they will be better.
Right ,now I think it's time for a cup of tea.
Cheers for now!
Labels:
felt ladybug
Thursday, 26 May 2011
Knits and Bits
A few weeks ago a friend and I went on a material shop hop, but sadly it wasn't too successful as out of the three stores we went, the two Big ones didn't actually exist. Well they must exist somewhere or must have existed at some stage (just not in the present), but they were not to be found at the addresses we had found on the Internet.
Anyway, on our travels we discovered a reject shop, which we simply had to visit. Most of it was the same as you would find at a red dot/crazy Clark's/2 Dollar shop/Crazy store, but I did came across some super soft chenille yarn just begging to made into something...and here that something is...
| A hot water bottle cover |
However, when I started knitting a while back, I thought I'd better follow the instructions exactly and tried my hand at my fist tension square...well it turned out so well, I figured it should be made into something useful.
So I folded it in half and stitched up the bottom and the side. Then I threaded some ribbon through the top and now my phone has a snug sock.
I must admit that that was my first and so far my only tension square, but imagine what you could make with a whole lot of them.
Thursday, 19 May 2011
Rainbow coloured order
So I went shopping for more felt material and came home with this...
And to end this blog off, I recently made myself a pair of rainbow coloured pyjamas...but just realised that they switched the turquoise and olive green around...grrr
So do you secretly arrange things?
Now I realise that this may be considered a hint at some obsessive compulsive disorder, but seriously don't you also avoid stepping on the cracks in the pavement...go on have a laugh :)
And when I laid them out on the table to take a photo it came to my attention that if things must be organised, if they have colours, they must be in accordance with the colours of the rainbow...
| Jellybeans...and if they had to be eaten, would you eat them randomly or by rainbow coloured order...personally I'd eat them in order of taste - least favourite to most yummy. |
| Cups |
| fridge magnets...though I must admit this one was a toss up between arranging by colour or by alphabet (I think alphabetically wins, as the colours are not evenly distributed) |
| Pens - and if something has to be highlighted then it goes in rainbow coloured order too...obviously! |
| Clothes, but they don't stay in this order for long... |
So do you secretly arrange things?
Now I realise that this may be considered a hint at some obsessive compulsive disorder, but seriously don't you also avoid stepping on the cracks in the pavement...go on have a laugh :)
Labels:
obsessive compulsive,
rainbow colours
Tuesday, 17 May 2011
Short but sweet
For a change, I felt I needed to make something quick and easy. So here are a couple of my new felt crafty thingummies. Apart from the cutting out (which is a bit fiddly), they are so quick and easy to make.
The ideas are endless...gift tags, Christmas decorations, create a hanging mobile or a little toy.
And...
The ideas are endless...gift tags, Christmas decorations, create a hanging mobile or a little toy.
The star is machine stitched around the edge, with a loop of ribbon inserted for hanging, and leaving a tiny gap along on of the straighter edges to insert the stuffing. The star was then stuffed and the gap stitched closed (by machine or hand). Then I added some rough embroidered lettering.
Next I made some little critters...
| A Frog |
And...
| My favourite...A platypus |
Now I need to go buy some more felt in different colours as there is much crafting to do...
Labels:
Christmas decoration,
Gift Tag
Subscribe to:
Posts (Atom)